本文最后更新于 194 天前,其中的信息可能已经有所发展或是发生改变。
一、实验目的:
掌握HTTP协议的相关理论与实践;掌握ESP8266的ESP8266WiFi.h、WiFiClient.h、ESP8266WebServer.h等库的基本方法及使用;熟悉网络应用中WebClient、Web Server的角色。
二、实验内容:
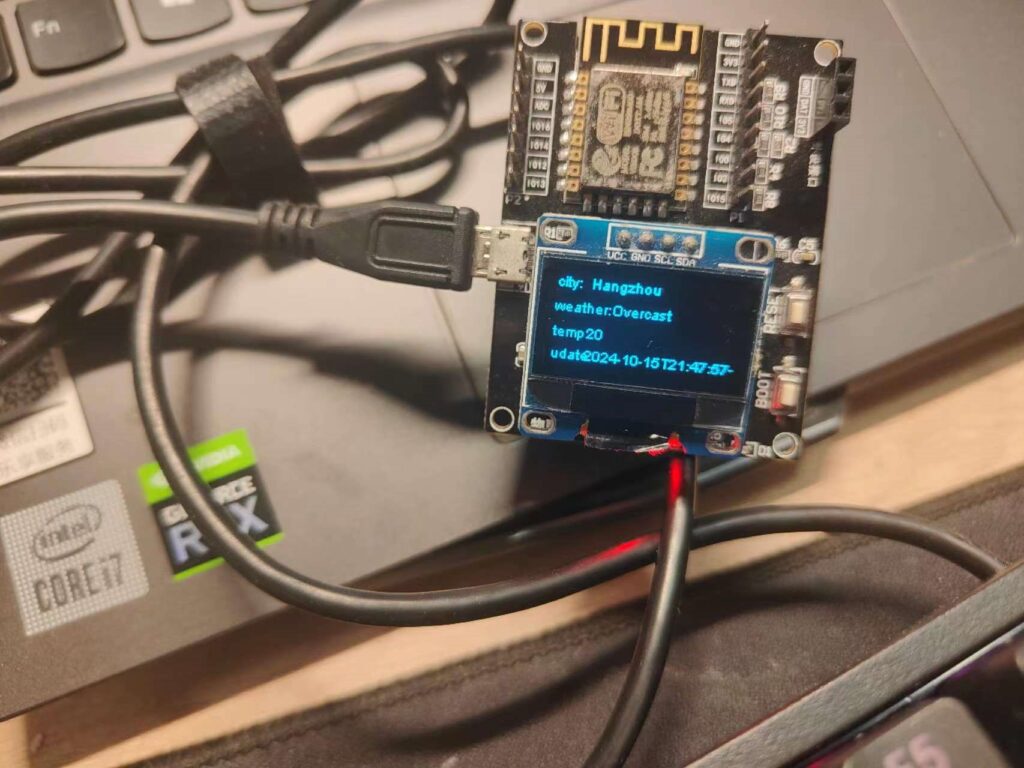
1. 将ESP8266作为HTTP Client;访问心知天气API,获取天气信息;
2. 将ESP8266作为Web Server,PC浏览器可以基于IP地址访问WebServer;
3. 实现ESP8266带登录认证的Web Server;
4. 对以上实验抓包分析。
三、实验步骤:
1. 访问心知天气的API,获取JSON并提取所需的字段,申请个人的心知天气的ID(https://www.seniverse.com/),通过TCP client包装HTTP请求协议去调用天气接口获取天气信息。
心知天气的host:
| https://api.seniverse.com/v3/weather/now.json?key=你的key&location=hangzhou&language=en |
本人心知天气的APIKEY:
| 略 |
完整代码:
#include <ESP8266WiFi.h>
#include <ArduinoJson.h>
#include <Wire.h>
#include "SSD1306Wire.h"

// 以下三个定义为调试定义
#define DebugBegin(baud_rate) Serial.begin(baud_rate)
#define DebugPrintln(message) Serial.println(message)
#define DebugPrint(message) Serial.print(message)

const char* ssid = "xxxx";         // XXXXXX -- 使用时请修改为当前你的wifi ssid
const char* password = "xxxx";         // XXXXXX -- 使用时请修改为当前你的wifi 密码
const char* host = "api.seniverse.com";
const char* APIKEY = "xxxx";        // API KEY
const char* city = "hangzhou";
const char* language = "en"; // zh-Hans 简体中文会显示乱码
const unsigned long BAUD_RATE = 115200;                   // serial connection speed
const unsigned long HTTP_TIMEOUT = 5000;               // max response time from server
const size_t MAX_CONTENT_SIZE = 1000;                   // max size of the HTTP response
SSD1306Wire display(0x3c,2,14);
// 从此网页中提取的数据的类型
struct WeatherData {
    char city[16]; // 城市名称
    char weather[32]; // 天气介绍(多云...)
    char temp[32]; // 温度
    char udate[64]; // 更新时间
};

WiFiClient client;
char response[MAX_CONTENT_SIZE];
char endOfHeaders[] = "\r\n\r\n";

void setup() {

    // put your setup code here, to run once:
    WiFi.mode(WIFI_STA); // 设置esp8266 工作模式
    DebugBegin(BAUD_RATE);
    DebugPrint("Connecting to ");
    DebugPrintln(ssid);
    WiFi.begin(ssid, password); // 连接wifi
    WiFi.setAutoConnect(true);
    while (WiFi.status() != WL_CONNECTED) { // 这个函数是wifi连接状态,返回wifi链接状态
        delay(500);
        DebugPrint(".");
    }
    DebugPrintln("");
    DebugPrintln("WiFi connected");
    delay(500);
    DebugPrintln("IP address: ");
    DebugPrintln(WiFi.localIP()); // WiFi.localIP()返回8266获得的ip地址
    client.setTimeout(HTTP_TIMEOUT);

    display.init();
}

void loop() {
    // put your main code here, to run repeatedly:
    // 判断tcp client是否处于连接状态,不是就建立连接
    while (!client.connected()) {
        if (!client.connect(host, 80)) {
            DebugPrintln("connection failed...");
            delay(500);
        }
    }
    // 发送http请求并且跳过响应头直接获取响应body
    if (sendRequest(host, city, APIKEY) && skipResponseHeaders()) {
        clrEsp8266ResponseBuffer(); // 清除缓冲
        readReponseContent(response, sizeof(response));
        WeatherData weatherData;
        if (parseUserData(response, &weatherData)) {
            printUserData(&weatherData);
        }
        DebugPrintln("response filed");
    }
    delay(5000); // 每5s调用一次
}

/*** @发送http请求指令*/
bool sendRequest(const char* host, const char* cityid, const char* apiKey) {
    // We now create a URI for the request
    String GetUrl = "/v3/weather/now.json?key=";
    GetUrl += apiKey;
    GetUrl += "&location=";
    GetUrl += city;
    GetUrl += "&language=";
    GetUrl += language;

    // This will send the request to the server
    client.print(String("GET ") + GetUrl + " HTTP/1.1\r\n" + "Host: " + host + "\r\n" + "Connection: close\r\n\r\n");
    DebugPrintln("create a request:");
    DebugPrintln(String("GET ") + GetUrl + " HTTP/1.1\r\n" + "Host: " + host + "\r\n" + "Connection: close\r\n");
    delay(1000);
    return true;
}

/*** @Desc 跳过HTTP 头,使我们在响应正文的开头*/
bool skipResponseHeaders() {
    // HTTP headers end with an empty line
    bool ok = client.find(endOfHeaders);
    if (!ok) {
        DebugPrintln("No response or invalid response!");
    }
    return ok;
}

/*** @Desc 从HTTP服务器响应中读取正文*/
void readReponseContent(char* content, size_t maxSize) {
    size_t length = client.readBytes(content, maxSize);
    delay(100);
    DebugPrintln("Get the data from Internet!");
    content[length] = 0;
    DebugPrintln(content);
    DebugPrintln("Read data Over!");
    client.flush(); // 清除一下缓冲
}

/*** @Desc 解析数据Json解析 数据格式如下:*/
bool parseUserData(char* content, struct WeatherData* weatherData) {
    DynamicJsonBuffer jsonBuffer;
    JsonObject& root = jsonBuffer.parseObject(content);
    if (!root.success()) {
        DebugPrintln("JSON parsing failed!");
        return false;
    }
    // 复制感兴趣的字符串
    strcpy(weatherData->city, root["results"][0]["location"]["name"]);
    strcpy(weatherData->weather, root["results"][0]["now"]["text"]);
    // 获取温度、最近更新时间
    strcpy(weatherData->temp, root["results"][0]["now"]["temperature"]);
    strcpy(weatherData->udate, root["results"][0]["last_update"]);


    return true;
}

// 打印从JSON中提取的数据
void printUserData(const struct WeatherData* weatherData) {
    DebugPrintln("Print parsed data :");
    DebugPrint("City : ");
    DebugPrint(weatherData->city);
    // 打印天气、气温、最近更新时间
    DebugPrint(weatherData->weather);
    DebugPrint(weatherData->temp);
    DebugPrint(weatherData->udate);
    display.clear();

    // display.setFont(ArialMT_Plain_8);
    display.drawString(0, 0, "city:");
    display.drawString(24, 0, (String)(weatherData->city)); // 显示数据而不是直接读取的字节
    display.drawString(0, 17, "weather:");
    display.drawString(40, 17, (String)(weatherData->weather)); // 显示数据而不是直接读取的字节
    display.drawString(0, 35, "temp:");
    display.drawString(24, 35, (String)(weatherData->temp)); // 显示数据而不是直接读取的字节
    display.drawString(0, 51, "udate:");
    display.drawString(24, 51, (String)(weatherData->udate)); // 显示数据而不是直接读取的字节


    display.flipScreenVertically();
    display.display(); // 刷新显示屏幕
}

// 关闭与HTTP服务器连接
void stopConnect() {
    DebugPrintln("Disconnect");
    client.stop();
}

void clrEsp8266ResponseBuffer(void) {
    memset(response, 0, MAX_CONTENT_SIZE); // 清空
}
结果:
2. 实现ESP8266带高级登录认证(AdvancedAuth)的Web Server,认证的用户名为本人姓名缩写;从PC端浏览器访问ESP8266的WebServer,登录后可以分别访问GPIO口的端口0和端口1,获取各端口的状态 (注意:务必请在浏览器页面上显示本人姓名和学号信息)。
代码:
#include <ESP8266WiFi.h>
#include <WiFiClient.h>
#include <ESP8266WebServer.h>

#ifndef STASSID
#define STASSID "XXXX"
#define STAPSK  "XXXX"
#endif

const char* ssid = STASSID;
const char* password = STAPSK;

ESP8266WebServer server(80);

// 检查是否存在并正确的Cookie头
bool is_authenticated() {
  Serial.println("Enter is_authenticated");
  if (server.hasHeader("Cookie")) {
    String cookie = server.header("Cookie");
    Serial.print("Found cookie: ");
    Serial.println(cookie);
    if (cookie.indexOf("ESPSESSIONID=1") != -1) {
      Serial.println("Authentication Successful");
      return true;
    }
  }
  Serial.println("Authentication Failed");
  return false;
}

// 处理登录页面和注销操作
void handleLogin() {
  String msg;
  if (server.hasHeader("Cookie")) {
    String cookie = server.header("Cookie");
    Serial.print("Found cookie: ");
    Serial.println(cookie);
  }

  if (server.hasArg("DISCONNECT")) {
    Serial.println("Disconnection");
    server.sendHeader("Location", "/login");
    server.sendHeader("Cache-Control", "no-cache");
    server.sendHeader("Set-Cookie", "ESPSESSIONID=0");
    server.send(301);
    return;
  }

  if (server.hasArg("USERNAME") && server.hasArg("PASSWORD")) {
    //用户名和密码
    if (server.arg("USERNAME") == "admin" && server.arg("PASSWORD") == "admin") {
      server.sendHeader("Location", "/");
      server.sendHeader("Cache-Control", "no-cache");
      server.sendHeader("Set-Cookie", "ESPSESSIONID=1");
      server.send(301);
      Serial.println("Log in Successful");
      return;
    }
    msg = "Wrong username/password! Try again.";
    Serial.println("Log in Failed");
  }

  String content = "<html><body><form action='/login' method='POST'>";
  content += "To log in, please use: admin/admin<br>";
  content += "User:<input type='text' name='USERNAME' placeholder='user name'><br>";
  content += "Password:<input type='password' name='PASSWORD' placeholder='password'><br>";
  content += "<input type='submit' name='SUBMIT' value='Submit'></form>" + msg + "<br>";
  content += "You can also go <a href='/inline'>here</a></body></html>";
  server.send(200, "text/html", content);
}

// 根页面处理,仅在认证成功后可访问
void handleRoot() {
  Serial.println("Enter handleRoot");

  if (!is_authenticated()) {
    server.sendHeader("Location", "/login");
    server.sendHeader("Cache-Control", "no-cache");
    server.send(301);
    return;
  }

  String content = "<html><body><H1>BY Han_ye</H1><H2>Hello, you successfully connected to ESP8266!</H2><br>";
  content += "<form action='/gpio/0' method='GET'><button type='submit'>Check GPIO 0</button></form><br>";
  content += "<form action='/gpio/1' method='GET'><button type='submit'>Check GPIO 1</button></form><br>";

  if (server.hasHeader("User-Agent")) {
    content += "The user agent used is: " + server.header("User-Agent") + "<br><br>";
  }
  content += "You can access this page until you <a href='/login?DISCONNECT=YES'>disconnect</a></body></html>";
  server.send(200, "text/html", content);
}

// 处理找不到页面的情况
void handleNotFound() {
  String message = "File Not Found\n\n";
  message += "URI: " + server.uri();
  message += "\nMethod: ";
  message += (server.method() == HTTP_GET ? "GET" : "POST");
  message += "\nArguments: ";
  message +=  String(server.args()) + "\n";

  for (uint8_t i = 0; i < server.args(); i++) {
    message += " " + server.argName(i) + ": " + server.arg(i) + "\n";
  }

  server.send(404, "text/plain", message);
}

void handleGPIO0() {
  if (!is_authenticated()) {
    server.sendHeader("Location", "/login");
    server.sendHeader("Cache-Control", "no-cache");
    server.send(301);
    return;
  }
  // 读取 GPIO 状态,可以根据需要设置为高或低
  int gpioState = digitalRead(0);  // GPIO 0 对应的引脚
  String message = "<html><body><h2>GPIO 0 Status: ";
  message += (gpioState == HIGH) ? "HIGH" : "LOW";
  message += "</h2></body></html>";
  server.send(200, "text/html", message);
}

void handleGPIO1() {
  if (!is_authenticated()) {
    server.sendHeader("Location", "/login");
    server.sendHeader("Cache-Control", "no-cache");
    server.send(301);
    return;
  }
  int gpioState = digitalRead(1);  // GPIO 1 对应的引脚
  String message = "<html><body><h2>GPIO 1 Status: ";
  message += (gpioState == HIGH) ? "HIGH" : "LOW";
  message += "</h2></body></html>";
  server.send(200, "text/html", message);
}


void setup(void) {
  Serial.begin(115200);
  WiFi.mode(WIFI_STA);
  WiFi.begin(ssid, password);
  Serial.println();

  // 等待WiFi连接
  while (WiFi.status() != WL_CONNECTED) {
    delay(500);
    Serial.print(".");
  }

  Serial.println();
  Serial.print("Connected to ");
  Serial.println(ssid);
  Serial.print("IP address: ");
  Serial.println(WiFi.localIP());

  server.on("/", handleRoot);
  server.on("/login", handleLogin);
  // 新增 /gpio/0 和 /gpio/1 的处理
  server.on("/gpio/0", handleGPIO0);
  server.on("/gpio/1", handleGPIO1);

  server.on("/inline", []() {
    server.send(200, "text/plain", "This works without need of authentication.");
  });


  server.onNotFound(handleNotFound);

  // 记录需要跟踪的请求头
  const char* headerkeys[] = {"User-Agent", "Cookie"};
  size_t headerkeyssize = sizeof(headerkeys) / sizeof(char*);
  server.collectHeaders(headerkeys, headerkeyssize);

  server.begin();
  Serial.println("HTTP server started");
}

void loop(void) {
  server.handleClient();
}
结果截图:
略